Mixing Techniques
By Dan Loh
Routines –
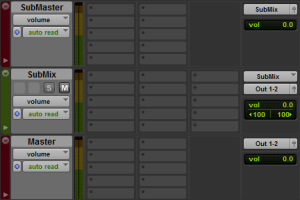
I usually follow a certain workflow and mixing habits I’ll do for most mixes, the following is all done in the box without any help from external hardware. Short guide on Acoustic Treatment here: https://danntheman.wordpress.com/2015/01/23/acoustic-treatment/ Routing & saving Processing power – To save as much CPU as possible I’ll send all audio tracks to a group aux as well as all effects, these then get routed to my Sub Master which goes into my Mix Bus, and finally into my Main Master Fader which I then hear through my monitors. I’ll further commit some of my settings to my audio tracks by recording internally in Pro-Tools or rendering in Audio-Suite option, so typically amp simulators will be printed onto tracks permanently as they require a lot of CPU and RAM, not without duplicating the track first of course! or I’ll just send all tracks to the same group channel if I don’t feel like making a decision.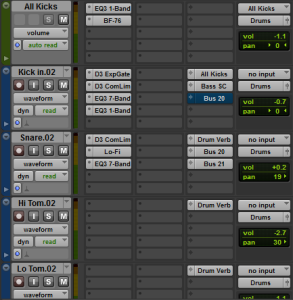
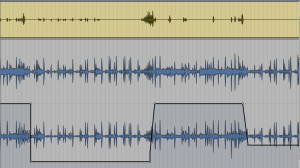
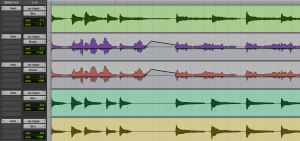
 Gain Staging Part II – Again it is important every instrument is recorded at a strong signal level to widen the gap in signal to noise ratio, I will want the signal to Pro-Tools averaging around -20dBFS (see Recording Techniques). When I get to the mix stage again I will check that every audio does not exceed -10dBFS, beyond this point begins to sound brittle and dry. What I’ll do in PT is either use a TRIM plugin and lower the input or on the individual audio track there is a little fader on the bottom left known as clip gain, lowering this is the same as the trim plugin as they alter the input gain. If everything but one section of the song is too hot I’ll split the clip and just turn down that specific section, so I won’t affect the entire audio track. Housekeeping – Strip silence, fade ins/outs, cuts, comping will take place at after getting the right levels, with X amount of tracks going on noise in between parts of audio just adds to headroom and clutter of sound, checking through everything in solo and clearing the garbage out can make a difference to a clean sounding track. Phase Part II – Double check everything again and go through the song, inverting the polarity to allow best phase cohesion and using comb filtering to my advantage, listening out for loss of bottom end is a quick tell-tale, but mostly waveforms give it away, if they both aren’t in the +/- axis at the same time, I’ll manually drag them so they align perfectly, but still listening for the most pleasant tone i.e. sometimes aligning two kick drum mikes because sound hits one of the mics earlier I’ll align them however, although they are more in phase could reveal a boxy resonant frequency so I’ll let it cancel out on purpose. Time Editing – beat detective, quantisation are an option but will kill the groove/life of the music, some parts will be edited for a tighter performance whilst others are left a little loose. Warping (Elastic audio in PT) slows down the waveform without affecting much of the audio pitch, when done wrong however, can lead to burping or glitch sounds in audio. I will usually separate the part in need of shifting to align them, what will normally happen is the audio will crossover with the existing waveform, what I do is zoom in and get the waveforms to meet each other perfectly to create a continuous waveform. Another thing that will happen is silences in-between shifted audio will induce audible pop/clicks due to sudden spikes in amplitude from silence into audio clips, crossfades will solve the majority of this issue.
 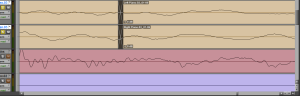 Mixing – The most important and hardest section in my opinion, getting a balance of all instruments and being able to identify the main elements of a song I find can be tricky. Before even slapping on any plugins I’ll spend a good couple tries getting the volume of each instrument to sit well in the mix, use of panning to separate an instrument. If it sounds good without even using plugins, the less tricky everything will be for me later on. The goal is to achieve a ‘tall, wide and deep mix’ the image below (pardon the drawing) shows a visual representation of a mix, increasing the amplitude acts as a way of bringing the sound forward and panning can work to your advantage for a nice stereo spread of instruments, allowing separation and ease of picking them out in a song. Most my mixes mimic a live setup where the drummer will typically be in the middle (assuming you get the best view at the gig), guitar players left and right, singer in the middle (usually running around psychotically).
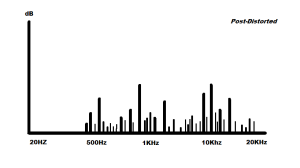
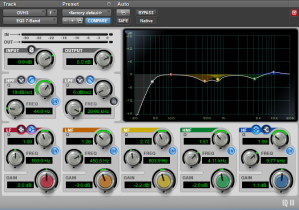
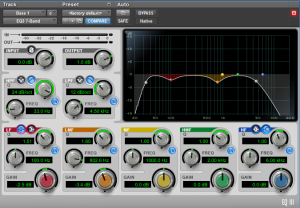
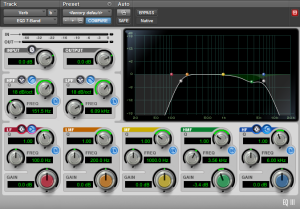
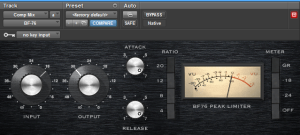
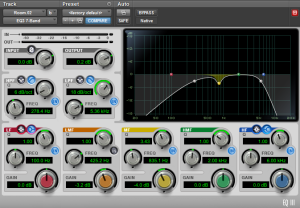
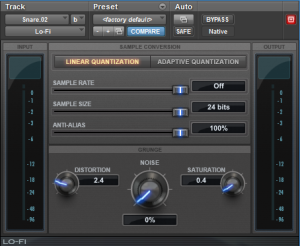
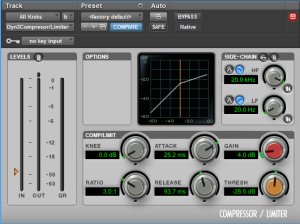
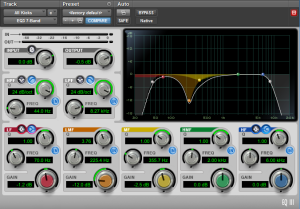
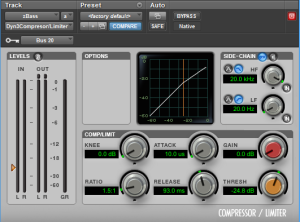
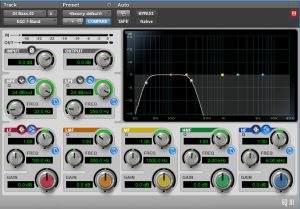
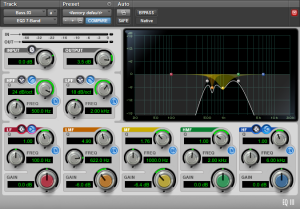
 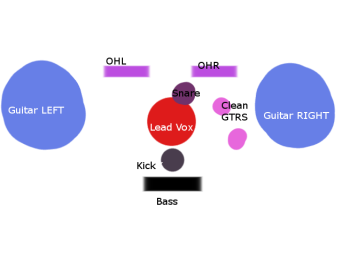 Using EQ – The majority of the time will be spent subtracting unnecessary mud, which is ‘masking’ other instruments in the mix, this means dividing the spectrum up and thinking in terms of bass, mid and highs. It is common for several instruments to occupy the same space in the mix and am too familiar with cymbals, distorted guitars fighting with the vocals in a mix as these occupy the 2KHZ – 4 KHZ range which ironically is what the ear is most sensitive to, with all these battling it out will result in ear fatigue and reach for the mute button. It’s down to a decision to pick which one of these get subtracted the most to allow the other to shine, while carving out space for the other instruments to sit in the mix, this is my main use of EQ other than general ‘tone shaping’. High pass filters are frequently used to rid everything residing below the filter, and opposite for low pass filters, these also have the best chance of drastically changing the phase relationship (true for all EQ moves) of the track and need to be used in moderation. Narrow cuts are mostly used to keep all the good stuff whilst ridding junk around it. As I don’t own any outboard gear, the harshness from stock digital EQ’s when boosting is a last resort for me, with more ‘refined’ plugins/hardware will have sweet spots in EQ boosts and cuts with more ‘character’ such as a Neve 1073 Mic pre & EQ. Using Compression – In short is like automated volume control but not quite, compression allows us to control the dynamics (loud & soft volumes) of a signal i.e. when setting fader levels you may feel like raising it on some sections and lowering on others, compression evens out the performance for a more stable fader position. Say a vocalist mumbles a phrase but screams the next, setting the threshold so a compressor kicks in those peaks turning them down and bring the volume back up with makeup gain, make up gain also brings up the level in the room and not just the signal, so when compressing a signal hard when levelling out will hear some ugly room sounds as well as artefacts produced by a compressor. We can shape the envelope of a signal with the attack (the time it takes for the compressor, after overshooting the threshold, to arrive at said percentage (ratio dependant) of its final gain reduction value) and release (determines how long it takes the compressor after the input has dropped below the threshold to return to its original gain value). Too fast an attack will stomp on your transients and make the audio appear further back in the mix, while a slow attack will bring something forward in a mix, allowing more transient energy to slip through, preserving the punch of the material. Too fast a release will stop compression as soon as the signal drops below threshold thus, compressing less of the signal but allowing more ‘recovery’ time before the next transient arrives which is what too slow a release does, but will increase the sustain on said signal. The ratio determines how much of the signal beyond threshold is reduced, the higher the threshold the more loss of dynamics but with more evenness. Ratios over 20:1 are generally considered ‘limiting’, acting as a ceiling for the signal, a brick wall limiter 100:1 is where the signal hits this ceiling and no further increase in volume is allowed. EQ before or after dynamics processing? – Compressors respond differently when EQ-ing into them, boosts will be turned down and cuts back up, but driving the boosts into compressors results in a different kind of sound, saturation isn’t the best way to describe it but close, the dynamics of the boosts will react according to the threshold settings which can be interesting and a way to ‘colour’ the sound of the signal, for transparency EQ after the compression will achieve a ‘cleaner’ result without the compression affecting the tonality. Mix Buss Compression – To reap the benefits of mix bus compression, at the start of a mix I’ll have a compressor on my mix buss, NOT later as this will just throw the levels out of balance, this works as a ‘glue’ for the overall song I’m working on, by narrowing the dynamics it gives the impression of a bigger/tighter sound. Being extremely cautious on my settings here I don’t want the compressor eating my transients so will set the Attack as slow as needed typically 15ms – 30ms. With the release being in time with the song. I’ll aim for about 2dB – 3dB of gain reduction, preventing an over squashed sounding mix. Distortion & Saturation (mild) – As a guitarist I approve and love the sound of tape saturation, several Lo-Fi/Massey Tape head plugins can be found throughout my mixes, I find it smooth’s out transients from the added harmonics, and fattens up bass and kick drums in particular. I may add it to a snare occasionally to fatten it up. Another benefit is adding to frequency ‘deprived’ audio to cut through a mix better, by creating new frequency components in fills in the ‘gaps’ affecting the tone to some extent.
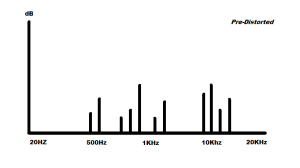
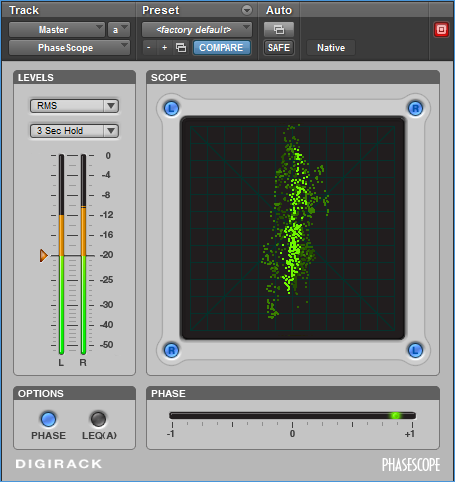
 Parallel Processing – A serious addiction, by sending a copy of the same track to an auxiliary that runs parallel i.e. drums, guitars and vocals, allows for me to enhance the sound to a further degree without directly affecting the dry sound, so for instance I’d like some distortion on the vocals but I only want to affect the ‘air’ frequencies so run an aux parallel with the vocals, now you should have two of the same vocals but louder, on the parallel chain add an EQ cut out all the body and mid-range until you’re affecting all the frequencies you want to affect, add your distortion to you hearts content, you can now choose the amount of distortion by turning the parallel aux up or down in the mix. Do note a rise in amplitude and some fader adjustments will be necessary. Another technique used today is parallel compression, to do this do on drums for example, slap a compressor of your choice (FET or VCA is a preferred if you’re about to HULK SMASH those dynamics) and then get the signal to pump and breathe in time with the music, squash the dynamics to taste and pick a ratio of your choice (all buttons for a dirtier sound and lower ratios if you’re looking to keep it under control). It should sound destroyed, now play the dry signal and sneak the parallel aux in, what we’ve is done made the signal more present due to its flat dynamics and thickening of audio (depending on what frequencies were there to begin with those can be used to boost the low, mid high end of a sound in particular), but at the same time kept the dynamics of the dry signal, when done right it should make the track more alive and exciting. Feel free to explode with evil laughter at this point and admire the monster of a creation you’ve conjured. Creating Depth – Sometimes sounds will just sound dead in a mix due to the close-micing, separation and acoustically treated space they were recorded in. Using artificial reverb and delay and help re-produce the atmosphere they were originally in or meant to be and actually create space, it can also help to make something sound less harsh as the wetness from the wash of reverb is prolonging the sustain of those less harsh frequencies. If you’re grown up unlike me… you’ll use a sensible amount to try achieve something like the image below (despite looking like a silly face), where the effect has been sent further back in the mix to avoid clouding up the sounds in front. A starting point with reverb is if you can hear it you’re using too much, if you can’t but you can feel it, you found a happy medium.
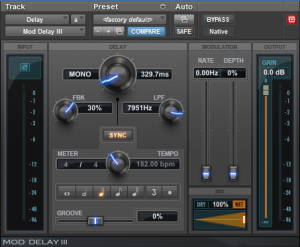
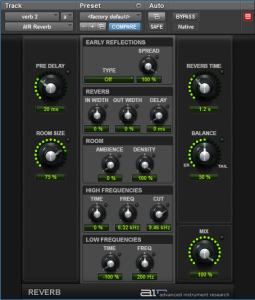
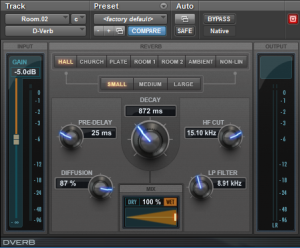
 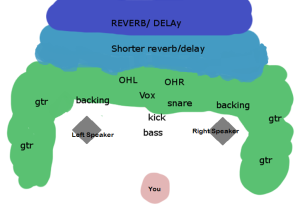 When setting reverb times you’ll want the decay time or T60 to finish by the next phrase/note or it’ll muddy up the rest of the track. Pre-delays will start the reverb a little after the dry signal so it doesn’t cloud up the signal, also giving the impression of a further sounding reverb as it mimics sound travelling across a room which then reflects back, allowing for shorter decay settings. I EQ these and often to achieve a better tone with the stock reverb I use and to minimise unwanted sounds poking out here and there, be aware of strange comb filtering that will affect the dry sound as well. A gate can be added after (old 80’s trick, don’t shy away from this) that is triggered by the snare, allowing you to get away with larger reverbs and catch less of the tail end of the reverb, the more the reverb however, the less modern it’ll sound. Delays are a cleaner more surgical approach for controlled space that won’t steal the spotlight, to benefit from this I usually have it in time with the song, plugins these days work it out for you but what if you had a beautiful piece of analogue hardware sitting around that didn’t? The formula, take 60,000 (milliseconds) and divide this by the bpm of the song, you’ll now have a ¼ note delay time, for 1/8 halve it, 16th halve that and so on. Don’t know the bpm of your song? No excuse modern DAW’s have built in tap tempo function, tempo maps and all sorts of sorcery at aid.
Pop 2 Mixes – Key Points
Track – Down to Dusk by The Motion
Intro – The intro begins with a rhythm guitar that plays for 4 bars, this obviously loses the attention of many audiences and the short attention span of youngsters today. So I added the drum verse from the beginning and automated a low pass filter down to 500Hz for a nice variation from the rest of the song, adding a close mic to each new bar and then automating the volume to rise as the song opens up.  Vocals – While tracking vocals I had my hand on the pre-amp, turning it down during chorus sections as it was constantly peaking. This squashed a lot of dynamics, further compression will just kill the life and energy of Kaia’s vocals, so I did live fader rides as the song plays by setting the track view to ‘Volume’ and the automation from ‘read’ to ‘write’, pushing the faders up as she sings louder and vice versa. Several re-attempts were made necessary to get the levels to also match the energy of the music.
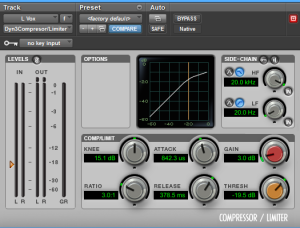
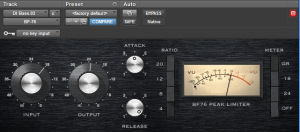
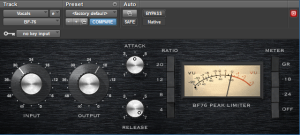
 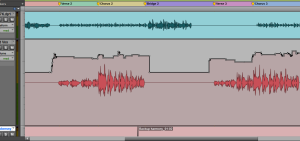 Before this I compressed gently to nudge back peaks into place and to bring up mumbles, fast attack to catch those peaks, fast release (BF76’s fastest release time is around 0.6 seconds).
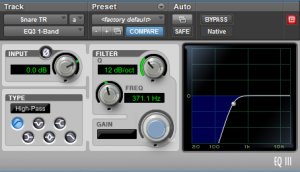
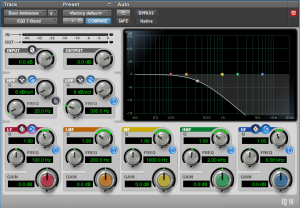
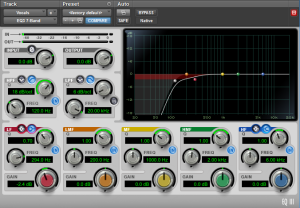
  A high pass filter (12dB octave) at 125Hz to rid low end rumble
 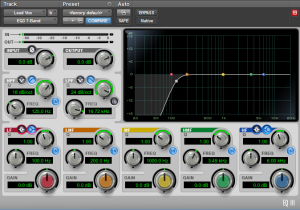 Guitars – A similar approach is taken on the rhythm guitars, whilst tracking the slaps were peaking on the desk, compression/limiting to tame these just won’t cut it as the gain make up brought out the dryness of the room and ugliness from the amp. I want to be able to compress gently without the compressor working overtime, I manually separated each slap and turned down the clip gain which in effect is turning down the input gain of the signal. Now compression sounds smoother and produces less artefacts. Attack 721.1us, release 333ms, no gain make up as I don’t want to bring up messy room noise this instrument has.
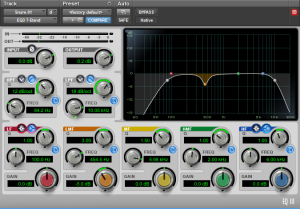
 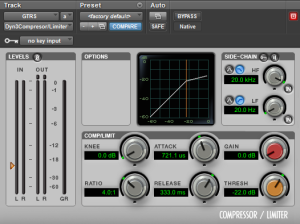 6dB octave HPF as some of the guitar rumble was pleasant, -2dB at 340Hz narrow 3.5Q ridding ugly low end, -3dB at 674Hz narrow 3.5 Q, ridding room muddiness, -2.5dB at 2.52Khz broad Q, space for vocals and cymbals.
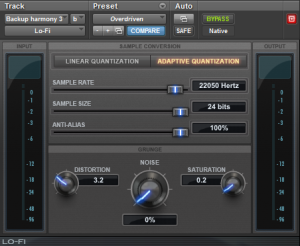
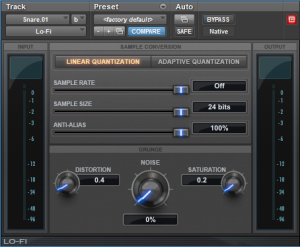
 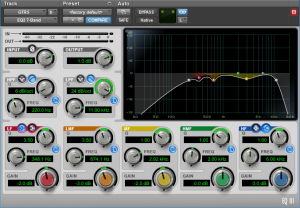 Backing Vocals – A telephone like effect was added for variation and to match the energy the song, band pass filter to rid everything below 400Hz and 6Khz, followed by some Lo-Fi saturation to further enhance telephone effect.
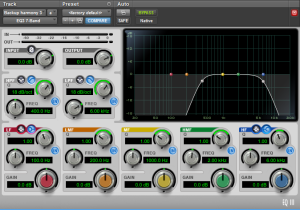
 Lead Guitar – I didn’t want this to stick out so much so some gentle filters worked nice to blend the rhythm and lead sounds together.
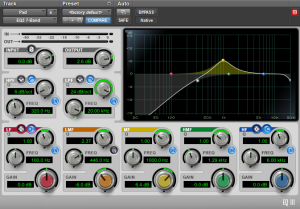
 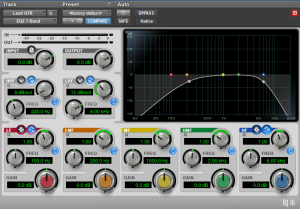 Drums – kick EQ, HPF at 44Hz (18dB octave), -8.9dB at 349Hz cutting ‘pillow’ sounds, -1.5dB at 1.27Khz cutting cardboard characteristics.
 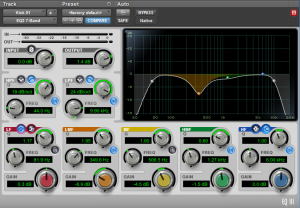 Snare – Compressed with 5:1 ratio, gain reduction of 4-5dB, 15.5ms attack for transients to slip through, release 333ms, in context with rest of kit. EQ HPF 12dB octave at 85Hz, LPF at 10Khz reducing cymbal bleed, -5Db at 450Hz cutting chunkiness and ringing. Lo-Fi saturation to increase fullness in low mid and overall snap.
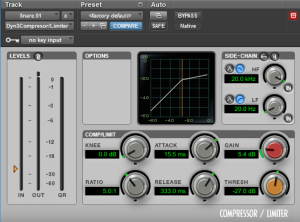
 Overheads – Side chain compression key’ing snare close mic as ducking source, GR of 4dB max, faster release to allow snare sustain to slide through, 721us attack (snare takes longer to travel in overheads). HPF at 44Hz, -3dB at 400Hz cutting mud, -2.2dB at 800Hz cutting weird plastic characteristics, -2dB at 4.11Khz for less abrasive cymbals, +1dB at 9.77Khz for shine to make up for cut at 4Khz.
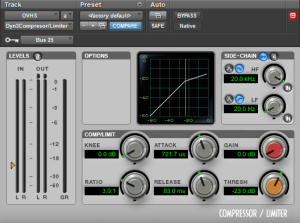
 Bass – Side chain compression to duck when kick and snare strikes for low end intelligibility, fast attack, 83ms release in time with kick and snare thump. 4:1 ratio compression, fastest release, medium attack for bass ‘boom’ to slide through, GR of 8dB, HPF at 33Hz (this is a damaging and hard to reproduce for most playback systems), -3.6dB at 802Hz cutting honkiness, wide scoop at 100Hz freeing space for kick drum low end.
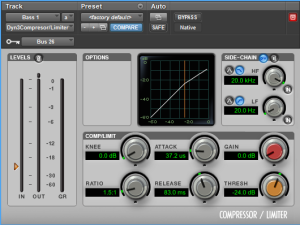

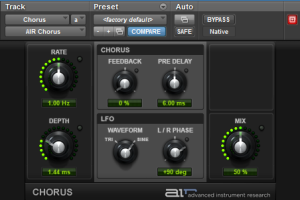
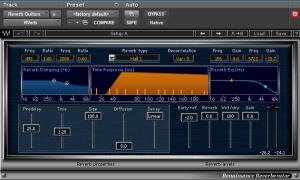
 Effects – A delay was added pre-reverb to give the impression of a large space and to not thread over other instruments, a reverb was inserted post delay to wash it and further enhance the large space with a decay of 1.6ms, pre-delay of 20ms, LPF at 7.5Khz. And a separate reverb was used for the drums. A chorus was added to the lead vocals, guitars to enhance the sound and make it cut through better with it’s doubled pitch.
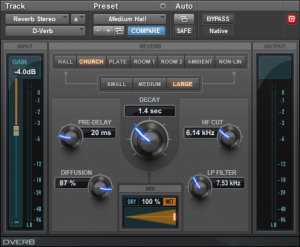
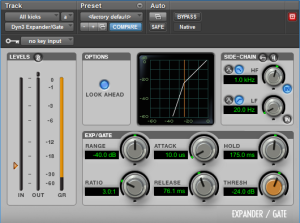
 Track – Sorry you’re not a winner Cover by Luis, Connor, Laurence and Shaun Drums – No knowledge of tuning a snare, I blindly recorded the snare that was in studio one at the time, this was still salvageable with some pitch adjustment by increasing it by a few keys. But the snare had a lack of snap from the 2 KHz – 6 KHz region, so shamefully added…… a snare sample with plenty of ‘crack’ and no body so it wont compete with the natural snare’s thump in the 100Hz – 200Hz region. Massey DRT identifies the transients in the snare track, by sliding the sensitivity and loudness knobs allows for proper control over what gets triggered, some hits will get triggered due to bleed so it may be wise to use a drum trigger in future to avoid double triggering. Next phase aligning is crucial for the two to work like bread and butter, the sample naturally has more higher frequencies so the waveform had a slight transient in the front, I aligned this so it was slightly before the natural snare for a more ‘realistic’ sound and so the mid frequencies don’t cancel each other out. Kick – an expander gate was inserted pre-compression (the compressor’s make up gain will bring up the softer sounds that you don’t want the gate to expand on) to shape the envelope to taste and to stop the resonant frequency from… resonating. then I compressed to even out the kick strikes with a slow attack to allow snappy transients through, a 77ms release and a ratio of 5:1. -10dB at 191Hz cutting pillow characteristics, -6.6dB at 500Hz ridding room mud.
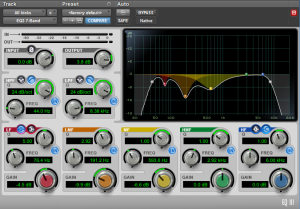
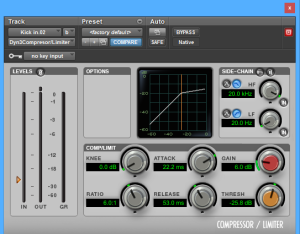
 Snare – compressed with a 4:1 ratio, medium attack, 100ms release for just the right amount of sustain, HPF at 75Hz (18dB oct) still being in phase with the rest of the kit, -5dB at 216Hz reducing body, 3.6dB at 410Hz reducing mud, -9dB at 729Hz freeing space for the second snare sample which is used for the snap, enhancing (not replacing) the snare. The second snare if high passed up to 371Hz still maintaining good phase cohesion. Finished up with Lo-Fi saturation on both snares making them sound fuller.
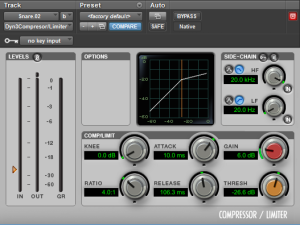

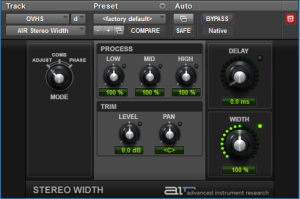
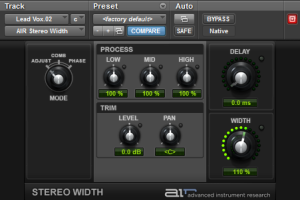
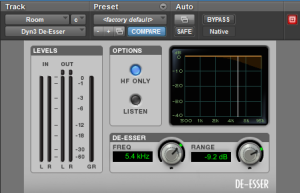
 Overheads – I used the snare and kick close mics again! as the compression side-chain input, this is to clean up the muddiness that the snare and kick bleed does to the close mics. I followed this by de-essing the cymbals as 8KHz in some sections got over excited and need some compression above this threshold. A 6dB oct HPF at 225Hz, -2.5dB at 450Hz cutting room mess, -1.5dB at 900Hz to lessen snare plastic characteristics and -3dB at 3.34KHz for less harshness from cymbals. I automated a width plugin so during verses the width would collapse to 20% and then back to 100% and then 110% on the final chorus.
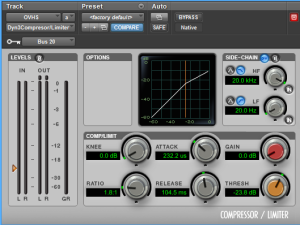

 Parallel Compression – Finish this off with parallel compression using a FET with all buttons in mode, on the slowest attack and fastest release to punch listeners in the face.
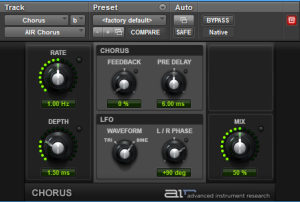
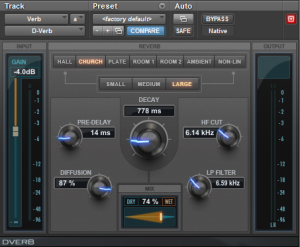
  Effects – Finally a chorus effect (high passed at 500Hz only affect the mid and high end) was added to the guitars as the original did have this and sounded exciting, a church reverb with a decay of 778ms and pre-delay of 14ms is sent to all guitars and drums to gel all sounds together this is band passed after to let the low and high end have more space for the mix. Mix parallel compression – Thats right! no your eye sights fine! all guitars and bass instruments are sent to this separate parallel aux which I then squash, this enhances the thickness of the guitars and creates an interesting pumping and breathing effect on the bass which is appealing.
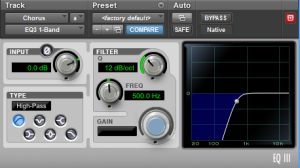
 Guitars vs Bass – ‘Battle of the lower mids’, my goal was to lock the two together thus creating the impression of one instrument. The guitars were tracked with a 4×12 so the body has been shifted to a lower register in the spectrum, bass has a superior bass sound (DUH!) so jogging a high pass 96dB oct) up to around 130Hz on the guitars lets the bass shine in this area, the battle continues in the 100Hz – 250Hz region, because its Metal it’s very common for the mids to be scooped out from guitars and a fair bit from bass too, Guitars were EQ’s with a narrow Q and surgical cut at 348Hz by -5dB rids some cab mud.
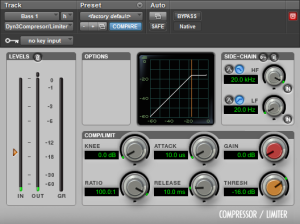
 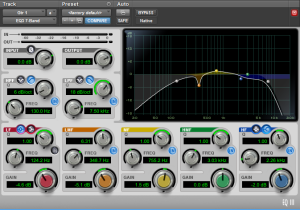 Bass Compression/limiting and side-chain – Just like mowing the lawn processing bass is somewhat the same (sort of), you get naughty dynamic peaks from slaps (weeds) and the low end eating headroom on the master fader and taking up all the low end space, this amount processing isn’t for the weak heart so brace yourself, I side chain the bass with the kick and snare being it’s key input, ducking 6db of GR. I added a limiter to shave off peaks of 1 – 2db (light trimming) before compression (using an FET like the BF76 for punch) of 4:1 aiming for 7-8dB of GR with a medium attack and fastest release to really unleash the apocalypse on those dynamics (smooth grass). A second compressor with a very soft knee is inserted after for smooth compression, nudging peaks back into place. In future, riding of the fader with aid of a RMS meter will achieve a cleaner/smoother result as the gain make up does bring up mess. This is followed by corrective EQ with -4dB at 388Hz frees the space allowing the guitars to sound less muddy and fat, -2.5dB at 75Hz for the low of the kick to breathe, -4dB at 166Hz with a narrow Q cutting the over resonant peak. If you think we’re done, you’re wrong multi-band compression can come in handy here and make the bass even tighter but in the end I thought no need as it already vibes well with the rest of the mix. By the end we should have a waveform that looks like a huge chunky block, now you’re thinking am I mad? there no more dynamics or life to the bass, probably and YES! now automation becomes a lot more simple and does exactly as I want it to, i.e. should I want the chorus louder than verses a wide selection and boost in the chorus and I’m set to go.
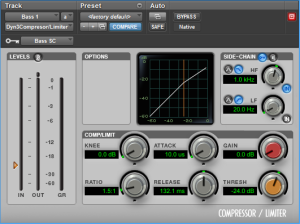


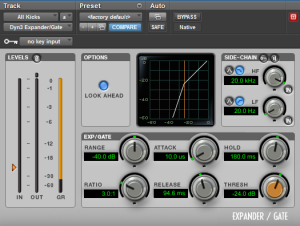
 Effects – I used a reverb for the drums and guitars and a chorus sent to guitars with a 50% dry to wet signal, Track – Hole in the Earth Cover by Collisional Drums – This is the same setup used for the track ‘sorry you’re not’, but an uninvited bass frequency showed up to loosen the kick drum performance. Kick – A narrow cut around 70Hz proved not enough as the sustain of the kick dragged on , an expander gate was inserted pre-compression (the compressor’s make up gain will bring up the softer sounds that you don’t want the gate to expand on) to shape the envelope to taste and to decrease over resonance in the low end. Next I couldn’t hear the kick on smaller systems so, sent the kick drum to an aux running parallel with the main kick, I used this as the kick beater volume control by high passing everything up to 1.5 KHz and annihilated this with an BF76. This was automated to not poke out in verse sections. Compressing for evenness 6:1 ratio as the kicks were very inconsistent in this case, 54ms release as the sustain of the kick was too long, aiming for GR of 6dB +. HPF at 55Hz and LPF at 9KHz to reduce cymbal bleed. broad cut -12.5dB at 180Hz freeing up space for guitars and bass. -6dB at 450Hz ridding pillow character
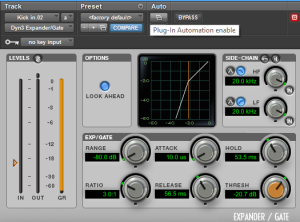
 Drum Room – were muddying up the whole mix, but were also a major contribution to the spread of the snare mics, I used the snare mic to trigger the side-chain gate on the room mic, allowing it only to open when the snare hits, the snare takes a few micro seconds to travel to the room mic so a somewhat fast attack was used, the hold settings were adjusted to prolong audibility of the snare. A 6dB oct HPF at 278Hz leaving behind a warm and punchy room sound without muddying the low end, believe it or not I did not compress this at all! a reverb was inserted last on a hall setting and a very short 872ms decay, pre delay at 25ms and a LPF at 8KHz.
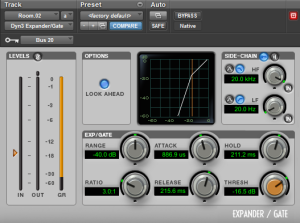
 Overheads – the snare bleed in the overheads were overpowering the snare mic (which I want to use for the main thump and snap of the tone), so using the close snare mic as the compressor’s side chain input function, so essentially ‘ducking’ the snare in the overheads every time the snare hits, only 4dB of reduction was enough as I do want some overhead bleed adding to the snap of the snare. I automated a width plugin for a nice variation on the overheads, so chorus sections really do sound different to verses and have a bigger impact on audiences.
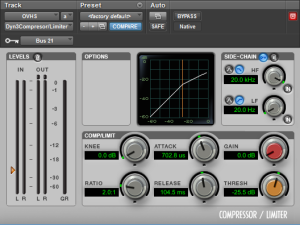
 The close mic’d snare was perfect as it was, some Lo-Fi saturation was added to increase the richness of the snare thump in the 150Hz range without needing EQ, a hall reverb was used on the snare and the rest of the kit to blend the tone together, jogging a high pass up to 40Hz to cut down on sub bass rumble. The pre-delay on the reverb was set to 25ms so the reverb could occur after the fact, this brings the reverb further back in the mix as well as further nasty comb filtering side effects (see creating depth in the previous section if you missed it), allowing for use of shorter reverb times.

 Parallel Compression (drums) – I finished this off with parallel compression to pump steroids into the overall drum sound, whilst keeping the dynamics.
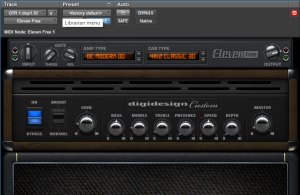
 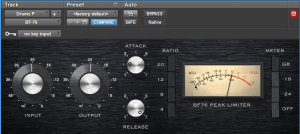 Guitars – The guitars on the left channel are the Marshall 4×12, while the right was the DI signal (due to timing issues had to result to this), I re-amped with Avid’s Eleven Free plugin using the modern distortion channel for it’s Metal tone. A 6dB per octave High pass was inserted on both guitars, as I wanted to keep some of the musical sounding rumble the 4×12 produced jogging the filter up to 140Hz, essentially blending the bass and guitars sounds together, a low pass was essential in the DI signal as the nasty highs in this spectrum just weren’t natural and too harsh in the mid range, a wide cut in the 2Khz – 3Khz regions were needed to allow cymbals and guitars to occupy similar spaces. The second guitar (DI) needed some extra crunch so added a dB of 2Khz followed by some tape saturation to smooth out the harshness of the digital sounding guitar. The guitar has it’s own reverb return using Wave’s Rverb (which was on sale when I got it). These reverb are a lot less ‘Lo-Fi’ and depending on preference can enhance or make something sound weird and cheap.
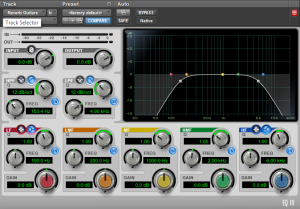
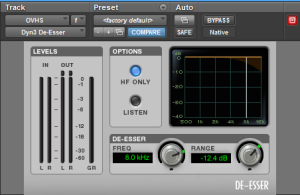
 Bass – Hopefully you’ve built the courage to read on if you’re familiar with my approach to bass processing, so far the only time I’ve not been so heavy is with Down to Dusk, where a dynamic and energetic bass vibes very well with that type of music, so I begin with a limiter getting 1-2dB of GR before adding my favourite 1176 PT’s stock compressor aiming for 7dB of GR. Next what I want is a smooth compression characteristic, opto compressors are a popular choice for many due to its warming characteristics and the recovery on the release setting (Fast recovery on the deepest parts of GR and slow on the last dB’s of GR). Another nice choice would be a Vari-MU (dynamically variable ratio compressor) style compressor for it’s smooth silky compression characteristics, neither of which I used so added the stock compressor setting a soft knee so compression gradually kicks in smoothly. Stacking compressors is key to heavy compression with minimal lumpiness along the way, essentially you’re compressing the already compressed signal taking the load off of one compressor, this can add an interesting dynamic to the sound level if the attack and release parameters were at different settings. The BF76’s fastest release is 0.6 seconds http://akmedia.digidesign.com/support/docs/Bomb_Factory_Plug-Ins_v70_26682.pdf so if I were to add a compressor after with a 400ms sec release time, the compressor will release roughly 200ms (attack plays a key role here too) before the BF76. If this isn’t your style feel free to automate the bass to your hearts content (with less casualties from the make up gain), also use an RMS plugin to aid in automation (if getting flat dynamics is what you’re after) but life’s too short for all that so improve your Comp-FU for better results in future. Track – Don’t you pity by Glen, Mike, Lindsey and Kenny Vocals – Sibilance and consonants were an issue in this track, I used automation to reduce the level of the letter K, and sibilance while I was at it. This gave me the smoothest possible vocals I’d ever achieved, de-essers tend to kick in when anything that sounds the slightest like sss or shhh, due to the signal’s sidechain input reading frequencies of around that region. The vocals share the same delay return bus, with a ping pong effect (one channel is slower/faster than the other), this then gets washed with a short 500ms reverb acting as gel for delay to blend better with the mix as everything here was recorded in the same room.
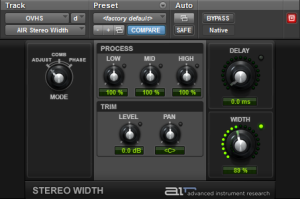
  Lindsay’s Vocals – Because I’ve automated all vocals, some compression is used to bring up mumbles or to tame peaks, only aiming for 3dB’s of GR, a 378ms release to allow time for her voice to sustain naturally. There is some noticeable harshness (like two voices but one scratchy and overly breathy) around the 8 – 9Khz area a broad cut helped, I followed this with some tape saturation hoping to fill the’ gaps’ in the frequency spectrum of her voice, lastly a stereo width plugin last to spread the vocals out giving the impression of a thicker vocal while also getting out the way of the kick, snare, bass which all in the middle.
 Glen’s Vocals – During Glen’s vocal section they sounded rather dull, a boost at 12KHz by + 2dB to bring in some ‘sparkle’ to his voice, this inevitably threw the balance out making his voice sound tinny, so I compensate this with a boost at 450Hz to bring out more of his chest voice. -2dB at 1.58Khz to reduce the honky/nasalness in his voice. Drums – snare – was out of tune, so a little pitch correction by about 45 keys sounded somewhat right, the overheads needed the same treatment as the snare bleed would have been out of tune with the close mics. The kick drum sustain was too long, a gate was inserted pre-compression again, adjusting the release parameters to achieve a sensible sustain the the kick drum, using the hold setting to adjust this further. compression of a 3:1 ratio aiming for 4db of GR nudging the kick into a more consistent performance, without slamming on transients with a 25ms attack, 93ms release. -12dB of 235Hz using a 3.25 Q to leave space for bass and the piano body.
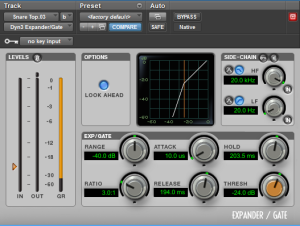
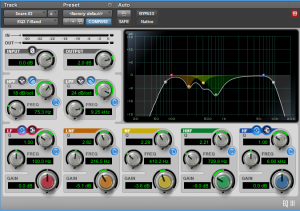
 Overheads – A high pass up to 125Hz (18dB/oct) as the build up of lower frequencies in this mix is more, due to the band being tracked together, a cut at 684Hz to nudge the snare back into place without need to side chain, a broad cut of -1.9dB at 2.9KHz reducing harshness from cymbals + space for vocals and piano.
  Piano – The book as the lid’s stand worked very well here, any bleed that snuck in was very pleasant to the ears, so added the same delay to the piano and automated this so towards the very end of the song creates a very interesting effect on the drum bleed. A gentle high pass to rid some unwanted rumble, the right and left channels are EQ’d differently to allow for a realistic listening experience, mimicking a piano’s note definition, by cutting the higher frequencies in the righ channel and then boosting this in the left, and then cutting the low mids and vice versa, this separates the piano a little and gives a ‘wider’ sounding effect to the piano overall.
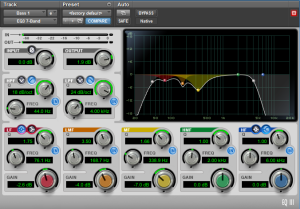
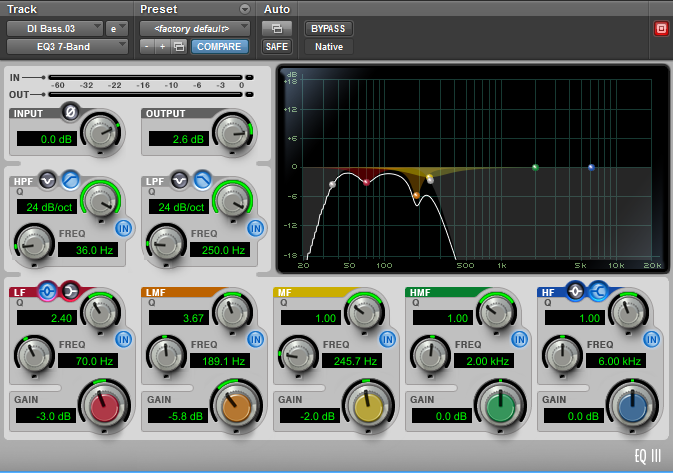
 Bass – The last one of this blog so straddle up! Glen and Lindsay were making comments how the bass sounded a little too 90’s slap bass (think Seinfeld intro), I didn’t want to affect the low end so I separated the low end from mid, so used the DI as the bass’s low end and the amp as the mid. on the low end channel, a 3rd order HPF up to 44Hz and LPF at 250Hz (no phase cancelations occur as I moved the filter around), with the mid channel a 24dB/oct HPF at 500Hz and LPF at 2Khz. Leaving a big gap from 250Hz – 500Hz, we wont miss it, the piano, snare thump, kick will make better use of this area. on the Bass group channel, I side chained using the kick as the key input, then you guessed it a limiter to keep things in control, followed by a BF76 for fattening and control getting 5dB of GR here, then finished off with soft knee compression with little GR. frequencies at 70Hz and 189Hz were being over resonant and ugly so a cuts were made there, finally cuts at 1Khz and 622Khz to rid of the ‘Seinfeld’ frequency.
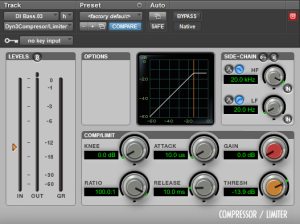

 Track – Love me like you do cover by Ellie & Evie Instruments – Originally the song recorded was acoustic, with vocals so I added MIDI instruments to this mix as sections lost audiences attention pretty fast. The key was to fill up the space left in the frequency spectrum so I added a bass, piano, synth, and an orchestra to support and not over power the main vocals and rhythm guitar. A very slow vibe approach is what is needed to match the energy/pace of the song, so I didn’t bother imitating the original version with it’s big drums and synth sounds. Once done I recorded the track by routing the instruments channels outputs to audio tracks, saving me a lot of CPU.
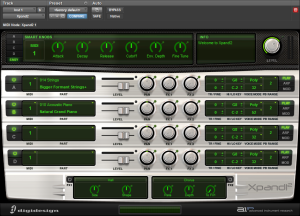
 MIDI EQ – 1st order HPF are key here for sounds to blend nicely and to give back some low end to the mix which was cut a lot on room and acoustic guitar mics. On piano 780Hz was being a ‘honky western’ piano zone so -3.6dB cuts here, on strings 362Hz was adding to the build up of muddiness in this mix so a narrow Q and -6.6dB cut to clean this up, a wide cut at 978Hz to take a step back in the mix. The pads weren’t cutting through so +6dB at 1Khz made up for this.
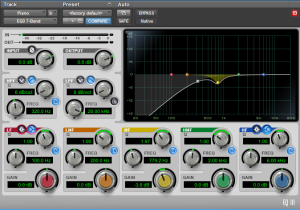

 MIDI Piano compression – For sustain and some realism, I compressed heavily with about 8dB of GR trying to bring up the room and warmth from the piano.
 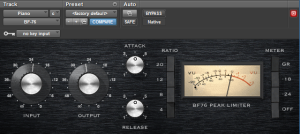 Room and Vocals – First order HPF at 220Hz, keeping guitar body and thump to a minimum, compressing slightly as we don’t want room mud to add again from gain make up. On the solo vocal track, a low shelf starting at 204Hz rids of some ‘phlegm’ noise. this is then controlled with a de-esser to cut down on sibilance and guitar pick harshness.
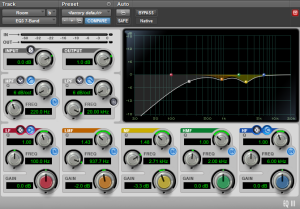
 reverb – The reverb is automated so that the gap after the verse leading into chorus gets a big wash of echo, adding more emotion and feel to the vocals. The decay time can be a lot longer than I normally use as the song tempo is very slow.
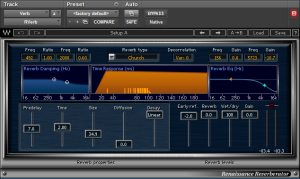
 Sonic Limitations – The whole song is recorded with 3 mics, one is a room that picks up the lead singer and singing guitar player, the other is for guitars, to the author of the ‘The Mammoth Phase Handout’ I salute you, phase becomes a big issue in this case as there are two sources (three if you count the guitar and singing) hitting one microphone at once, so same frequencies inevitably arrive at the mic at different times and some will ‘lag behind’ in phase, resulting in some weird comb filtering. This also makes timing and mistake edits very difficult as the main source (lead vocals) is in the same mic that the mistake would have occurred in, so removing or shifting them would have been very obvious. Nonetheless in a pop song clean editing is a must but has prevented me to some extent. Unleashing the Apocalypse upon audio clips by deleting silences, sibilance reduction, crossfades, consonant control for clean audio was a necessity.


![Create+a+Headphone+Send+In+Pro+Tools[1]](https://danntheman.files.wordpress.com/2015/05/createaheadphonesendinprotools1.jpg)


