Production – 5 Recordings in 5 weeks
By Dan Loh
Session 1 – Studio 3 Sorry you’re not a winner
Engineers – Dan Loh (Miking, ProTools)
- Liam Flower (Miking, Mix Console)
- Ryan Hornsby (Miking, Live Room)
31/03/15 – 9:30am – 10:00am mic setup
10:00am – 10:05am gain stage and rehearsal
10:05am – 10:20am re adjusting mic placements
10:20am – 11:20am Drums
11:20am – 12:00pm Bass
12:00pm – 1:00pm guitars
1:00pm – 1:15pm pack down, save and backup session
| Input | Microphone | Technique | Instrument |
| 1 | Audix D6 | At sound hole (Inside) | Kick Drum |
| 2 | Shure SM57 | 45 degrees at centre of snare | Snare |
| 3 | Samson C02 | Spaced Pair | Overheads Left |
| 4 | Samson C02 | Spaced Pair | Overheads Right |
| 5 | AKG D112 | On Axis (6 inches from speaker cone) | Bass |
| 6 | DI Signal | Bass | |
| 7 | Shure SM57 | On Axis 2 inches first speaker cone | Guitar |
| 8 | Shure SM 57 | Off Axis 45′, 2nd speaker cone | Guitar |
| 9 | CAD M179p | 7 feet from centre of kit | Room |
| 10/11 | Audio Technica Pro25 | 4 inches from Toms at centre of toms | Toms |
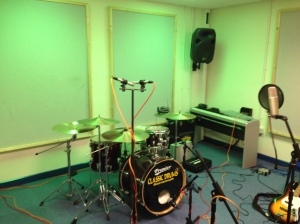
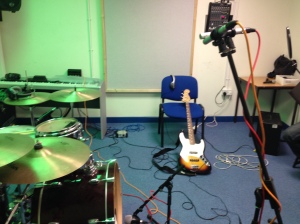
During the session we recorded the whole band in the room at the same time for a feel of the track, we then overdubbed vocals later however, we were not impressed with the performance due to the amount of bleed in microphones which limits us from processing as we are prone to phase issues and nasty comb filtering effects should we change anything around, the guitar and bass volumes had to be loud enough in the live room for the band to be audible over the drums as two of the aux’s on the multicore were unstable, this means only the drummer and one other musician could hear themselves. The decision was made to re-record the band at a later date and with complete separation of all instruments.
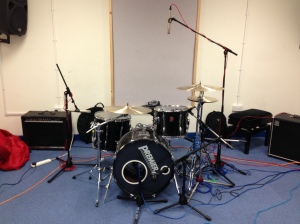
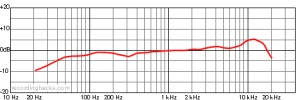
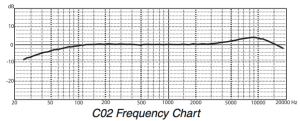
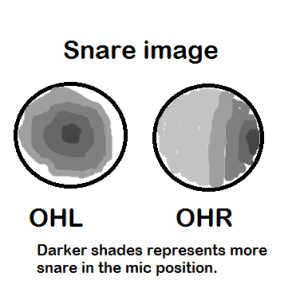
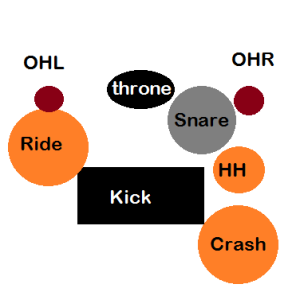
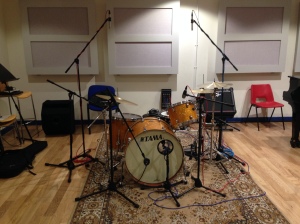
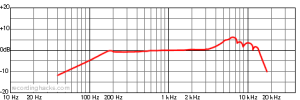
After a month I recorded the band in studio one for the next 4 hours, we started with the drums and this time we had the double bass pedals necessary to fit the song, I used Samson C02’s as a spaced pair of overheads using the bass drum as the centre of the kit, this means the snare is now off to one side of the stereo image, that’s ok I love panning them to one side anyway since bass, kick, vocals and other junk are already occupying the middle, this gives me total freedom over how wide the kit will sound and easy modification of the tone, these were pointed straight down at the floor as opposed to angling them, thus keeping ceiling and wall reflections to a minimum. The C02s gentle increase from 3Khz peaking at 9KHz by +4dB, this gives the necessary bite and air I’m looking for in the cymbals. The image below shows the position of the overheads mics (red dots) and where the snare is positioned in the stereo field of the overheads (darker grey shades) you can click on the images to zoom in.
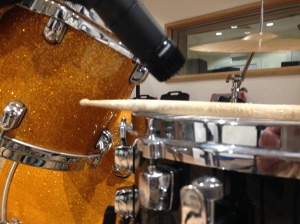
On Axis Shure SM57 on the snare capturing the snap of the snare by aiming it in the centre, the proximity effect when the positioning of the mic is close to the snare produces a nice low end boost that the SM58 doen’t produce as well. The +6dB peak at 6Khz captures the crack from the snare chains and drum sticks when struck.
The almighty Audix D6 inside the kick drum (the scooped mids and +10dB boost around 100HZ is ideal for Metal) which really rids boxy and dull characteristics in the low mid and mid sections. The huge boosts of +15dB captures serious snap from the attack of the beater head and a healthy balance of low end.
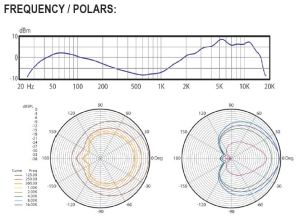
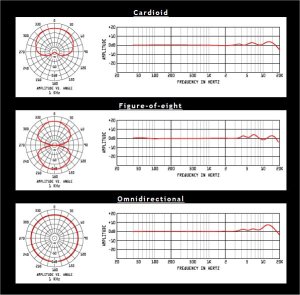
I also planted a room mic facing the centre of the kit around 6 – 7 feet away, this can be used as a low end boost for the drums as well as a layer of density and ‘glue’ because of the near flat response from 40Hz up to 3.5Khz which is ideal when capturing sources from metres away. The CAD M179 has different polar pickup patterns available at the twist of a knob, doing so changes the high end response slightly, I kept this at cardioid again for simplicity and to not capture the rooms weird reflections which I don’t particular find pleasing.
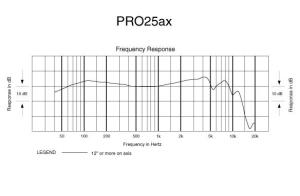
A pair of Pro25’s for toms, the frequency response is somewhat similar but bot as exaggerated as the Audix D6, giving priority to the kick drum in the mix, so the toms dont sound as punchy as the kick, but when combined sound like they were recorded in a similar environment and sound like one kit.
I used a DI for bass running parallel with an amped (plugin) for the bassist to listen to, this allows him to achieve the amount of not definition that he was looking for, and allows me complete freedom late on to re-amp the clean signal with amp simulators or with real amps.
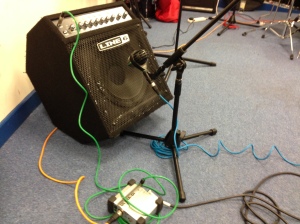
Guitars were recorded with a beautiful Marshall 4×12 cab modelled after a JCM800 I believe, The cabinet is placed on a built in stand which reduces vibrations/rattle that travel along the amp itself and around the room. I placed a 57 on axis on the first cone for the initial attack and mid of the tone and a second 57 45′ off axis on cone 2 for more body and chunkiness. Again the proximity effect comes handy to capture low end cabinet rumble, with larger 4×12 cabinets the muddy resonance in the low mids (250Hz – 500Hz) are shifted low in the frequency spectrum which is more pleasant to listen to, it is down to the mixing stage to control how much of this slips through, both bass and guitars cannot be dominant in this area unless a muddy mix is what you’re after. The boosts in 6Khz range from the SM57 can be too ‘scratchy’ in some cases, but a low pass is usually inserted to reduce this.
Headphone Mixes – In studio one the first two faders of the TLAudio M4 desk have the ability to switch to pre-fade, meaning the signal gets sent out to an individual headphone mix that is unaffected by the volume changes of the M4’s individual channel faders. Now band members are able to have their own mix in their headphones while I can adjust level using the M4’s Pre Fade Listen (PFL) to monitor the signal gain.
Session 2 – Studio 4 Down to Dusk by The Motion
Engineers – Dan Loh (Miking, ProTools)
- Liam Flower (Miking, Mix Console)
- Ryan Hornsby (Miking, Live Room)
| Input | Microphone | Technique | Instrument |
| 1 | Shure PG 52 | At sound hole (outside) | Kick Drum |
| 2 | Shure SM57 | On Axis at centre of snare | Snare |
| 3 | Samson C02 | XY Coincident (90 degree angle) | Overheads Left |
| 4 | Samson C02 | XY Coincident (90 degree angle) | Overheads Right |
| 5 | DI Signal in control room | Bass | |
| 6 | Rode NT2A | On Axis w/ pop filter | Vocals |
| 7 | Shure SM57 | On Axis 2 inches from speaker cone | Guitar 1 |
| 8 | DI Signal (different take) | Guitar 2 | |
| 9 | Shure SM57 (Deleted) | Off Axis 2 inches to right of speaker cone (different take) | Guitar 2 |
the first step was recording Kaia’s vocals and guitars as a guide track for the rest of the band, So didnt bother with a guitar DI this time and miked the amp with a SM57 and vocals using a RODE NT2A. The small boosts in the 2Khz, 4Khz and 15Khz areas brings out intelligible mid range clarity, and air in Kaia’s vocals, there is a slight attenuation in the 7Khz – 8Khz after the peaks that can capture less sibilance from her voice, but is dependant on which frequency spectrum her sibilance resides.
The song included a lot of string slapping which peaked heavily on the desk, so we had to allow about 20++dBFS of headroom for the peaks. This caused the main rhythm to have a weak signal of around -25dBFS on average. We then tracked bass using a DI and drums together using XY as overheads with the snare being the centre of the kit, the issue with this technique was it captured the room’s overtones and awkward cardboard characteristics as it was tracked in a smaller room so is more prone to weird reflections, the phase cohesion is easily achieved as audio hits both mics at the same time sure, but at ruined by it’s tone. Again C02’s on this recording, but brought out a lot of clean snap from the snare.
Lead guitar was tracked on a DI and an SM57 off axis for a less mid focused tone allowing the rhythm to dominate the main mix.
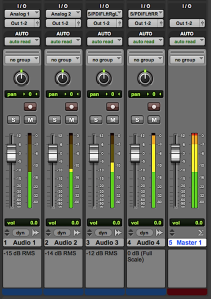
Headphone mix – The vocals were tracked two days later in studio 5 which uses the Pro-Fire 2626 as it’s main interface, this means headphone mixes have to be sent within Pro-Tools itself using sends as the interface has no dedicated aux mix faders/knobs, it does however have dual headphone outputs so I am still able to have my own mix without affecting Kaia’s personal headphone mix. To actually do this, under the sends menu in either the edit or mix window view simply sent the individual tracks/group tracks to output 1/2 enabling pre-fade. It is worth remembering that muting individual channels in Pro-Tools doesn’t affect the headphone mix (which I forgot on numerous occasions, which led me to the same request ‘can you turn the click down please?’), you will have to return to the send menu in edit/window view and select the little fader from there.
Session 3 – Pop Studio 5 Love me like you do by Ellie and Evie
Engineers – Dan Loh (Miking, Mix Console)
- Liam Flower (Miking, Pro Tools)
| Input | Microphone | Technique | Instrument |
| 1 | RODE NT2A (Fig 8) | In between singer and guitar player | Room |
| 2 | Samson C02 | XY Coincident (90 degree angle) | Acoustic Guitar |
| 3 | Samson C02 | XY Coincident (90 degree angle) | Acoustic Guitar |
| 1 | RODE NT2A (cardioid) | On Axis w/ pop filter (different take) | Vocals Dub |
| 1 | RODE NT2A (cardioid) | On Axis w/ pop filter (different take) | Vocals Dub and lead |
A Rode NT2A was used as a room mic and to capture both singers on the figure of eight setting, we set this in between the two and duplicate the track and pan each hard left and right, inverting the polarity on one of them, a popular way is to also add a cardioid mic in the middle of the figure of eight called mid side miking or ‘fake stereo’.
The guitar player sat on the opposite side and was miked with two Samson C02’s with XY coincident at 90 degrees. The first C02 was pointed at the sound hole, this captures the fundamental frequencies of the guitar and the body and warmth in the low mids. The second C02 faced the guitar frets, allow for more note definition and high end ‘sparkle’ that the first C02 isn’t capture as well. Some attenuation or de-essing may be used at mixing to reduce the fret squeaks and overbearing bite.
Session 4 – Post Metal/Experimental Hole in the Earth by Collisional
Engineers – Dan Loh (Miking, Mix Console, Pro Tools)
| Input | Microphone | Technique | Instrument |
| 1 | Audix D6 | Inside sound hole, off axis 2 inches to right of beater head, 4 inches away | Kick Drum |
| 2 | Shure SM57 | 45 degrees at centre of snare | Snare |
| 3 | Samson C02 | Spaced pair, using centre of kick drum as guide, both same height. | Overheads Left |
| 4 | Samson C02 | Spaced pair, using centre of kick drum as guide, both same height. | Overheads Right |
| 1 | DI Signal (different take) | Bass | |
| 7 | Shure SM57 | On Axis(4×12 cabinet) | Guitar |
| 8 | Shure SM57 | On Axis(4×12 cabinet) | Guitar 2 |
| 9 | Shure SM57 | Off Axis at speaker 2, 45 degrees pointed at centre of speaker cone | Guitar 2 |
Bleed from other microphones were a key role in this recording for the drums, the spread of the snare and crack is mostly from the overheads and room mic, I used a spaced pair as my overheads with C02’s for its bright high end and response to transients, again the kick drum being the centre so I can pan the snare off to one side in my mix. The idea behind this is that the drummer is playing from an audience perspective so his snare and hi-hat would be on the right while kick in the middle. To avoid resonant nodes and awkward room mud, I used a DI which can be re-amped later, I find miking bass in odd shaped and untreated rooms to always contain resonant mud around the 80HZ – 160HZ range, and sloppy sounds at 250HZ – 500HZ, or maybe I’m just unlucky. The guitars were miked on axis on the first speaker cone, another 45′ off at the second for the body and thump around 250HZ. The same setup is used for the previous song ‘Sorry you’re not a winner’ so please check that for more info.
Session 5 – Jazz/Blues Don’t you Pity by Finder
Engineers – Dan Loh (Miking, Mix Console, Pro Tools)
- Liam Flower (Miking, Pro Tools)
| Input | Microphone | Technique | Instrument |
| 1 | Audix D6 | Inside sound hole, off axis 2 inches to left of beater head, 2 inches away | Kick Drum |
| 2 | AKG D112 | At resonant Head 2 inches away | Kick Drum |
| 3 | Shure SM57 | 45 degrees at centre of snare | Snare |
| 4 | STC 1000 | Glynn Johns, 1 meter from centre of snare, positioned near floor tom | Overheads Left |
| 5 | STC 1000 | Glynn Johns, 1 meter from centre of snare | Overheads Right |
| 6 | DI Signal | Bass | |
| 7 | AKG D112 | On Axis 3 inches away | Bass |
| 8 | Used a thick book to semi close lid to limit bleed, Positioned pianist left view, on axis to strings 3 inches. | Piano L | |
| 9 | Position pianist, right view, on axis to strings 3 inches. | Piano R |
The whole band played in the same room with the piano being miked with clip on mics, we then kept the piano lid ajar using a thick book, as the piano stand was to long and would receive more bleed from everything else. We Di’d the bass, miked it with a D112 should the bassist use any effects we will be able to replicate this in mixing.
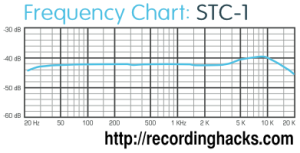
Glynn Johns was used for the overheads with both mics being equal distant from the snare for best phase cohesion and stereo imaging. There is slight attenuation in the 2Khz range Compared with Samson C02’s which is smooth all the way till the higher frequencies.
Two kick and snare mics were used which I could then audition and rid one in the mix. The vocals were overdubbed the next week in studio one, using an Avantone CK6 for its tidy high end boost and smooth mid range somewhat similar to a vintage U87 but still not the same thing of course! A pop filter was used to avoid plosives and to protect the condenser, pro longing its life and condition from moisture and SPL’s from the vocalists. the Avantone’s rich high frequency boost is much richer compared to the NT2A’s, but a little too much as it did increase the scratchiness in one of the vocalist’s mic’s around the 14 Khz area which is where to boost is.
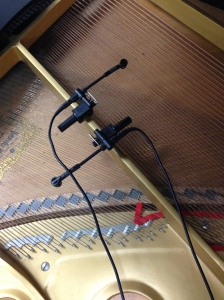
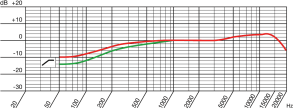
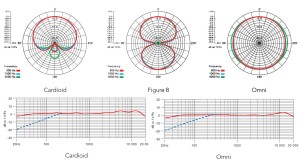
Piano – We used two AKGC518M’s as they were brilliant clip on mics with a grip that was able to attach onto the inside of the piano, one was facing the bass strings of the piano while the other faces the higher end of the spectrum, allowing for it to be panned to stereo in a mix giving the impression of a real piano playing infront of the audience. The C518m has a nice roll starting at 1Khz which really helps to ot capture the mess from the low end of the piano allowing space for the lower frequencies from other instruments.
Mother Cover
Engineer – Dan loh
Musicians – Dan loh, Charlie Draper, Glen Salmon
I decided to drop the Jeff Lynne style in the end as I am just not worthy of such greatness, I kept the bass, piano, vocals and lead guitars as the main elements of this song.
Recording Techniques –
Gain Staging – Every instrument is recorded at a strong signal level to expand the gap in signal to noise ratio, to avoid raising the gain later thus bringing up the accompanied noise floor as a consequence however, it is also important not to allow any clipping (especially digital) to occur at all during the process and allow some headroom for sudden spikes in dynamics.
Typically averaging at 0dBVU on an analogue desk and then when the signal gets to Pro-Tools will want it averaging -20dBFS, not only does this allow more headroom (0dVU = -20dBFS) but a lot of digital plugins have been tested and programmed to run best around this level. I will allow peaks of up to -10dBFS in PT, depending on how good it sounds (kicks, Snares).
Bleed – When recording a whole band together, it’s important to minimise bleed in each microphone, this can sometimes be a burden later on in mixing, turning the guitars could mean turning up the piano bleed too. It isn’t always a bad thing as this makes everything sound more live and together, working as ‘glue’ for the overall mix.
Microphone Choice – There’s no right or wrong when it comes to mic choices or is there? Depending on the style of music may want to consider the frequency response, pickup pattern and type of mic it is (dynamic, condenser, ribbon). It would be unwise to place a condenser mic right in front of the beater head of a kick drum considering their general sensitivity in SPL’s. The pickup pattern means I can limit bleed in a mic (cardioid = picks up sound in front of it).
Most microphones pickup patterns capture the mid and higher frequencies from directly in the middle of the capsule therefore, angling them off axis will start to capture less of the high/mid and more lower frequencies until eventually rejecting the sound altogether, so angles of mics will be essential from minimising bleed, but repositioning of sources and dividing instruments will offer best isolation of the source.
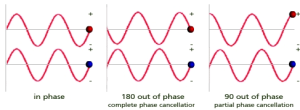
Phase – Eventually all tracks will be summed into two mono speakers or Stereo, compression and rarefaction will occur in the diaphragm of microphones due to sound pressures, the same is true for speakers where the cone gets pulled and pushed, so phase will be an issue when one or more microphones is in question, different frequencies will arrive at the microphone at different times, sometimes masking or even cancelling out completely, this can be used to advantage i.e. a ring in snare mics can be cancelled out but MUST be cautious and always achieve best phase cohesion meaning the waveforms are all in aligned, going in the +/- polarity at same times, polarity inversion is where the phase is rotated a complete 180′ so if a wave at it’s + phase is being pulled by a – polarity will cancel or sound like your ears are being sucked out. These will be flipped several times during recording listening for best phase cohesion, particular paying attention to the lower end as bass frequencies are more likely to cancel.
Source – The sound from the source accounts for probably 50% of a recording so I avoid the ‘fix it in the mix mindset, I’ll always make sure the musicians tune their instruments before takes and that drum kits aren’t over ‘ringy’, to fix this I’ll grab some tape and a soft piece of cloth or tissues and tape it to the tom/snare etc., I’ll make sure that I capture the performance of the band as they would sound in a live setting, so If what I hear in the control room sounds nothing as good compared to how it sounds in the live room, I’ll move around mics (change them), change the settings from the source (guitar, bass amp) etc.
Context – Before laying down any mics I will plan how I want it sounding sonically, and how everything will sit in the mix beforehand, some of these questions I ask myself include depth of instruments, balance, main elements of song etc. So if I’m recording a rock band, I typically want the vocals to be very up front as well as the guitars, and the kick to cut through the bass guitar more often than not.
I.E If you’re familiar with the difference of a rock/metal kick drum to a jazz/blues kick drum, you’ll hear that with rock/metal there is some sort of contour in the mid range and more beater from the kick drum, as opposed to jazz/blues which has more thump and woody sounding. So typically I would choose a mic with a frequency response that matches what I’m searching for frequency wise. I’d probably go for Audix D6 for a metal.rock style whilst sticking to a AKG D112 for other less agressive styles.
Etiquette – Psychological skills do come in handy here sometimes in ensuring the best take for a song, so positive feedback and constructive criticism for musicians when recording a take is vital, Using clean language and politeness towards colleagues and musicians ensures a professional atmosphere that takes the pressure of everyone allowing for ease of the recording process.
A neat and tidy studio lets musicians know we care, and ensures a safe environment for everyone at the studio so we will wrap cables around mic stands and sweep cables under carpets when possible preventing accidents which could potential ruin a take later on.

![Create+a+Headphone+Send+In+Pro+Tools[1]](https://danntheman.files.wordpress.com/2015/05/createaheadphonesendinprotools1.jpg?w=300&h=146)
